
Introduction
For this project, you will be creating 3D chess pieces ready to 3D print using Tinkercad. Chess is played with six different types of pieces – the pawn, rook (castle), knight (horse), bishop, king and queen. For this project, you will start by creating a pawn using this tutorial, and will then use those skills to help create the rest of the pieces in any design you want.
In this project, you will be introduced to concepts relating to working in three dimensons. Three dimensional work requires careful measurement, and attention to detail. Pieces can look good from one view, but if measurements are not used correctly, rotating the camera will leave you with pieces that cannot be printed.
Guide
- To begin, you will need to go to Tinkercad and log in to your account. To do so, click log-in in the top, and click on Students with Class Code. From here, enter the class code followed by your nickname (both will be provided by your teacher).
- Click on designs in the left menu, and then click on Create Your First 3D Design. You will be taken to a workplane (grid) that has nothing on it.
- We need to give our new design a name. By default, Tinkercad will enter a random name, and changing this will allow us to find designs easier in the future. To rename your design, click on the name in the very top menu, and rename your design to “Pawn”.
- Before we begin building our pawn, become familiar with some of the basic controls of Tinkercad.
- If you click and hold the middle mouse wheel, you can pan the camera from side to side and up and down.
- If you click and hold the right mouse button, you can rotate the camera in place. This is helpful to look at your designs from all angles to make sure they line up.
- If you scroll the middle mouse wheel up or down, you can zoom in and zoom out.
- If you click and drag the left mouse button, you can select more than one object once they are added.
- Start by adding a ruler to your workplane. You can do this by clicking on the right angle ruler on the right side, or by pushing R. Choose the location of your ruler. It doesn’t matter where you place it, but try to put it towards the bottom left of your workplane to give lots of space to work. Your ruler will be used as reference for measurements for the rest of the pieces you add.
- We are going to start by adding a circular base for our pawn. On the right menu, click and drag one of the orange cylinders onto your workplane.
- You will see many different measurements and points that you can click. Experiment with them to see how you can change an object’s scale (size), location or rotation.
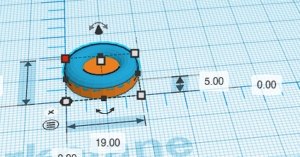
- To get exact measurements in Tinkercad, it is easier to use the measurement numbers. For this pawn, we want to change the base so that it is 19mm wide, by 19mm long, by 3mm tall. Your plane should now look as follows:

- Next, we want to make sure we are working right in the corner of our ruler. To do this, we can change the green measurement numbers to 0. Your plane should now look as follows:

- You now have a base! Next we want to add a curved lip to the top of the base. To do this, click and drag a blue torus onto your workplane. Change the length and width of the torus to match the cylinder (19×19) and keep the height at 5mm. Place it in the corner by changing the green distances to 0. Your pieces should now overlap as follows:
- We will continue to build our pawn going up. Add a purple cone to your workplane. Make sure the measurements and location match. Change the width and length to 19 and set the green location measurements to 0.
- A pawn typically will angle in with a cone and then go straight up. Add an orange cylinder to your workplane. Because this piece needs to be smaller than the base, change the width and length to 7mm. To centre this on our base, we need to do some math! The base is 19mm, the cylinder is 7mm. To place this in the middle, we need to:
- Find the difference between the sizes. In this case, we use 19mm (the base) and subtract 7mm (the new cylinder) and get a difference of 12mm.
- Divide this in half. Because we want our new piece centred, we should divide this in half. Half of 12 is 6.
- Set the green distances to 6mm. To make sure everything is lined, up, use the right mouse button to rotate around your design. If it’s not centred, you need to fix your measurements. Your design should now look as follows:

- We have 2 more parts to add. We will start by adding a round collar to go under the head of the pawn. Add another torus to your workplane. Change the width and length to 9mm. Change the height to 3mm. Before we place in in the corner, let’s lift it off the plane. To do this, click the arrow at the top of the torus and drag it up. Make the height 19mm and then place it centred to the base. (19-9 is 10. Half of 10 is 5mm). Your design should now look as follows:
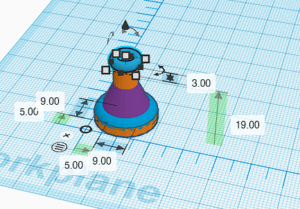
- As a last step, we need to add the ‘head’ of the pawn. Click and add a blue sphere to your workplane. Set the width, length, and height to 9mm. Set the elevation to 20mm, and set the distance from the ruler to 5mm.
- Your pawn is complete – however right now it is made up of a number of different parts instead of being one piece. To complete your design, click and drag to select all the pieces, and click group (or push CTRL+G) in the top right of your workplane. Your piece will now be combined. Note that if you group a hole (the transparent pieces in your shapes menu) with a solid object, it’ll cut out the parts that were in the hole.
- Now that you’ve created a pawn, your job is to complete the rest of your pieces. To do so, start a new 3D design and create all the pieces in it. Please note the following requirements and recommendations:
- All your pieces should have a width of 19mm. The heights can vary, but typically you want to create the pawn shortest, followed by rooks, knights, bishops, the queen, and the tallest as the king.
- Your designs should be your own. However, don’t make them too complicated as they will not 3D print as easily.
- If you need inspiration, use Google! Looking for things like “basic chess piece designs” or “geometric chess pieces” is a great place to start.
- It does not matter what colour your pieces are on Tinkercad. When we 3D print your pieces, the colour will depend on the filament we load into the printer.
Key Concepts
- Functioning in 3D Space – How do we use the basic controls in a 3D modelling software.
- Editing 3D Objects – How do we alter and change properties of 3d objects?
- Combining Objects – How do we use various 3d objects, including holes, to create new shapes?
- Measuring in 3D Space – How do we make sure pieces are lined up and measured correctly to allow for 3D printing?